Learning-Git
Table of contents
- Setting up your git bash
- Initialize local repository
- Commands
Setting up your git bash
The first steps is to find the git bash application that you installed previously
After running git bash you will have to configure it with your GitHub user name and email address like this.
git config --global user.name "your username"
git config --global user.email "your email"
To confirm that your data was successfully saved you can execute one of the following commands.
NOTE: some give more information than others.
git config --global --list
git config --list
Initialize a repository locally
git init
View the status of modified files
git status
To add a file to the stage we use the following command
git add <name-file>
To add to the stage all the files that have been edited, use the following command
git add .
Perform a commit (code capture) with a message about the changes that were made
git commit -m "Message commit"
If we want to skip the two previous commands ( git add, git commit -m ) we can do the following, it is like watching a shorthand
git commit -am "Message commit"
It is possible to remove them in several ways, either by deleting the file from the folder, but it may not always be so because maybe that file only added a couple of new lines or that file had to be added in a separate commit, then git makes it easy to remove that file from the staging area with this command:
git restore --staged <name-file>
Now we will have to create a git repository to be able to add our project
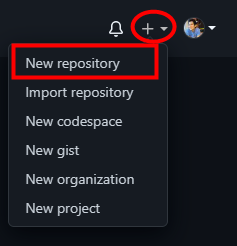
- Click on the “new repository” option
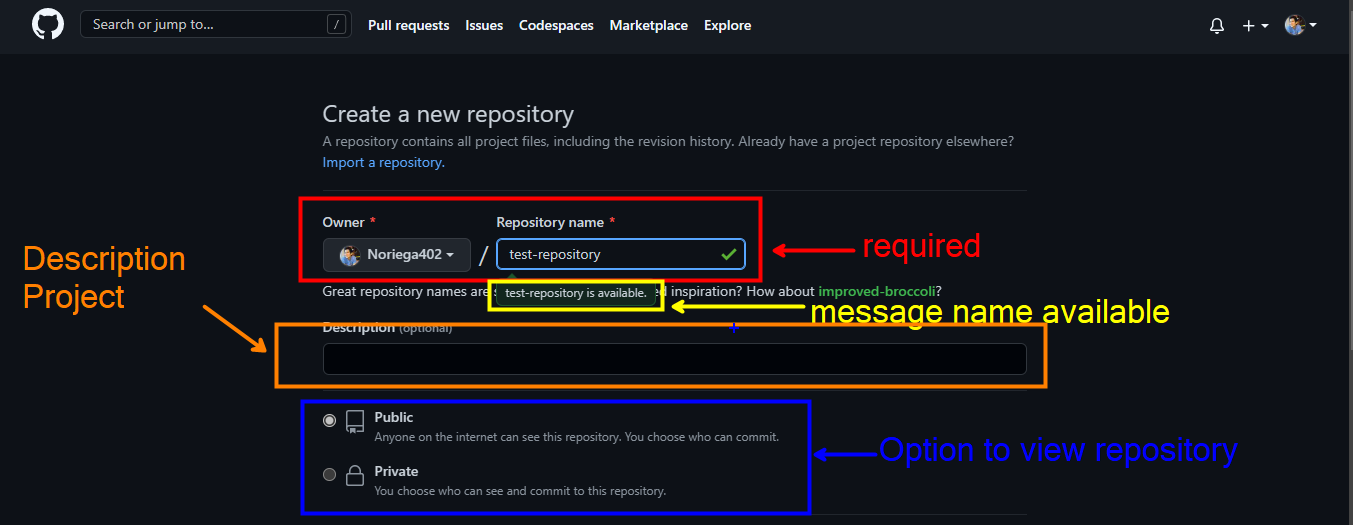
- A name is required for the repository, so we insert one, GitHub is responsible for seeing if that name we have already used before, if not if it validates the repository name field
NOTE: The repository view option must be public, otherwise no one will be able to see our project
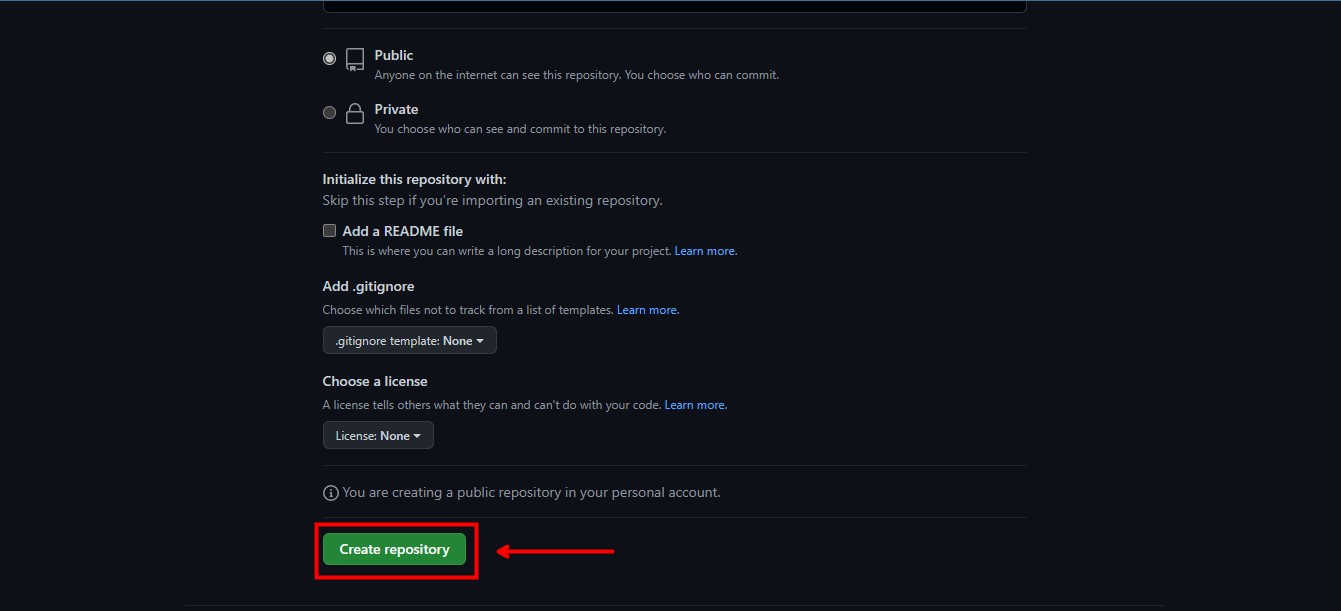
- Click create repository
A space like this will appear:
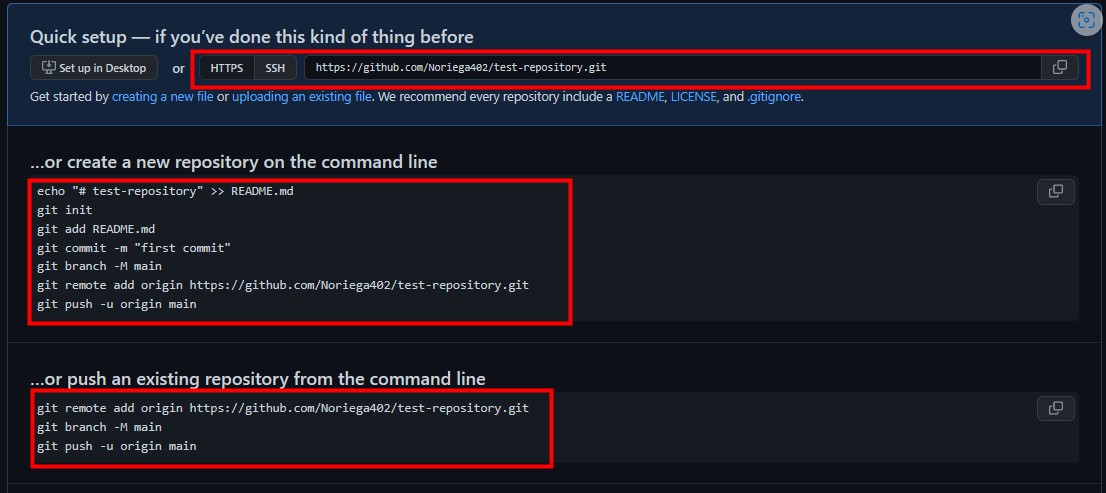
- The first box is to connect by https or SSH to our repository, for the moment it will only be by https.
- The second table gives us some of the commands already mentioned above and some new ones that we will mention later.
- The last table is similar to the second with the difference that if the repository already existed there is no need to do more extra steps.
The following command is to create a README file to our project (if necessary) otherwise we can skip this step:
echo "# test-repository" >> README.md
To create the main branch in our project you need mandatory use of the following command because the ” -M “ option is to force it to move to the main branch
git branch -M main
Now we add the path in which our staging area will connect to our remote repository through this command
FOR EXAMPLE: git remote add origin https://github.com/Noriega402/test-repository.git
git remote add origin url
Finally we make all changes or new files are uploaded to our repository on GitHub:
git push -u origin main
Once these steps have been done we can go to our repository on GitHub and refresh the page.
Other commands
git push
standard
The most commonly used to upload the first commit
git push -u origin <branch-name>
--force
To forcibly upload changes
git push -f
NOTE: Do not use the -f flag unless you are absolutely sure of what you are doing. It can cause a lot of problems.
--all
To upload all the changes you made in all the branches.
git push --all
--tags
To upload all the tags you have created.
git push --tags
git commit
-m
To be able to create a commit message without using a code editor
git commit -m "Your message commit"
-am
In addition to including the commit message, this option allows you to skip the staging phase. The addition of -a will automatically stage any files that are already being tracked by Git (changes to files that you’ve committed before).
git commit -am "Your message commit"
--amend
Most of the time it happens to us for the commit message we write it wrong, then this command helps us to correct the commit again.
git commit --amend -m "Fixed commit message"
--no-edit
In case we forget to add a file or folder to a commit, we can also add it this way with a new option and there is no need to edit the commit message or add a new one:
git add name-file
git commit --amend --no-edit
git clone
--branch
Use it to be able to clone a specific branch of a repository.
git clone --branch <nameBranch> <urlResporitory>
Example:
git clone --branch docker https://github.com/Noriega402/Node-API-REST.git
or the short form:
git clon -b <nameBranch> <urlResporitory>
git diff
diff
It is used to be able to see in console the changes made, either we delete or add new lines of code
git diff
diff "file"
We can use it to see the changes made in a single file
git diff <name-file>
diff hash-old hash-new
We can use it to see the changes made between one commit and another
git diff <hash-commit-old> <hash-commit-new>
git rm
You have several options which are as follows:
-r
- Gives permission to delete recursively within a folder
git rm -r
--cached
- To remove changes added to the stagin area.
git rm --cached name-file
-rf
- To forcibly delete a folder
git rm -rf name-folder
git --log
We have many changes or commit in our repository, as the project gets bigger, my project will have more commits, the good thing about this is that each commit has a message to know what changes were made, but how to see the name of those messages and see the hash of each one, we have several ways:
- To view changes in an extended way. By default it displays the following fields
- Secure Hash Algorithm (SHA).
- Author.
- Date.
- Commit message.
git log
--oneline
- A simple and easy way to read
- Displays one commit per line.
- the first 7 characters of the hash (SHA).
- The commit message.
git log --oneline
--stat
- This option causes the following results:
- Displays the files that were modified in each commit.
- View the number of lines added or removed in files.
- A summary line with the total number of files and lines modified.
git log --stat
--patch
- There is a shorter version instead of writing –patch, you can with -p and this displays the following on the screen:
- The files you’ve modified.
- The location of the lines you’ve added or removed.
- Los cambios específicos que ha realizado.
- Extensive version
git log --patch - Short version
git log -p
--graph
- Allows you to view the history of commits by means of a small graph
git log --graph
joins log
- Most of these commands can be merged into a single line, I invite you to practice them or discover them for yourself.
git log --graphgit log --oneline --graphgit log --oneline --graph --decorategit log --oneline --statgit log --oneline -p
git branch
branch
View local branches
- You can see all branches in your repository.
git branch
View all branches
- To view your repository branches
git branch -a
-v
- View branches with their last commit (hash and message).
git branch -v
New branch
New name branch
- To create a new branch in the repository
git branch development
checkout
- To change branches
git checkout name_branchThere is a shortcut to create and move branches in the repository.
git checkout -b new-name-branch
Rename branches
--move
Form One
git branch --move old-name-branch new-name-branch
Form Two
git branch -m old-name-branch new-name-branch
Deleting branches
-d
  git checkout main
  git branch -d development
  git branch
git stash
Saves the current Staging job in a list designed to be temporary called Stash, so that it can be retrieved in the future. To add the changes to the stash, use the command:
git stash
We can put a message in the stash, in order to differentiate them in the git stash list in case we have several elements in the stash. This with:
git stash save "Your messagge to stash"
list of items in the stash
To see the list of changes saved in Stash and thus be able to retrieve them or do something with them we can use the command:
git stash list
Get elements from the stash
The stashed behaves like a data Stack behaving in a LIFO (Last In, First Out) way, so we can access the pop method.
The pop method will retrieve the last stashed state from the list and insert it into the staging area, so it is important to know which branch you are in to be able to retrieve it, since the stash will be agnostic to the branch or state you are in. It will always retrieve the changes you made in the place you call it.
- To retrieve the latest changes from the stash to your staging area use the command:
git stash pop - To apply changes to a specific stash and remove it from the stash:
git stash pop stash@{<num_stash>} - To resume the changes of a specific Stash position you can use the command:
git stash apply stash@{<num_stash>}NOTE: the
you get it from the git stash list
Creating a branch with the stash
To create a branch and apply the most recent stash we can use the command:
git stash branch <branch_name>.
If you want to create a branch and apply a specific stash (obtained from git stash list) you can use the command:
git stash branch branch_name stash@{<num_stash>}
By using these commands you will create a branch with the name
Removing element from the stash
To remove the most recent changes within the stash (element 0), we can use the command:
git stash drop
But if, instead, you know the index of the stash you want to delete (via git stash list) you can use the command:
git stash drop stash@{<num_stash>}
Where the
git clean
If, on the other hand, you want to remove all elements from the stash, you can use:
git stash clear
Executing the default command may result in an error. Git’s global configuration forces the force option to be used with the command for it to be effective. This is an important safety mechanism as this command cannot be undone.
NOTE: git clean only detects new files, not just repeated files.
Simulate a file deletion
git clean --dry-run
Delete the files listed as not to be tracked.
git clean -f
Delete the folders listed as not to be tracked
git clean -df
git reflog
Git saves all changes even if you decide to delete them, by deleting a change what you are doing is just updating the branch tip, to manage these tips there is a mechanism called reference logs or reflogs…The management of these changes is through the reference (or ref) hash’s which are pointers to the commits…The hash’s record when the Git references were updated in the local repository (local only), so if you want to see how you have modified the history you can use the command:
git reflog
git reset
- soft: when the –soft argument is passed, the reference pointers are updated and the reset stops there. The staging environment index and working directory remain intact. It may be difficult to clearly demonstrate this behavior.
NOTE: with soft, deleted files are not recovered, they just remain deleted in staging.
git reset --soft <hash-commit>
- –hard: This is the most direct, DANGEROUS and usual option. When –hard is passed, the commit history reference pointers are updated to the specified commit. The staging environment index and working directory are then reset to reflect the specified commit. All previous pending changes to the staging environment index and working directory are reset to reflect the state of the commit tree. This means that any pending work left in the staging environment index and working directory will be lost.
Note: with hard if the files are recovered inside our computer, as if they had never been deleted.
git reset --hard <hash-commit>